A Primer on Traits
Traits are a significant source of power in Halls of Torment. They provide upgrades to your character, and most importantly are somewhat controllable by the player. But for new players just learning about the game, the trait system can be difficult to fully grasp.
It’s plain to see how impactful they are. But there are some deeper mechanics to traits that can help you elevate your gameplay to the next level.
Just how many traits am I allowed to select? What do the arrows next to them mean? What exactly are trait variants? The goal of this page is to address commonly asked questions about traits, and help you better understand the system.
About Traits
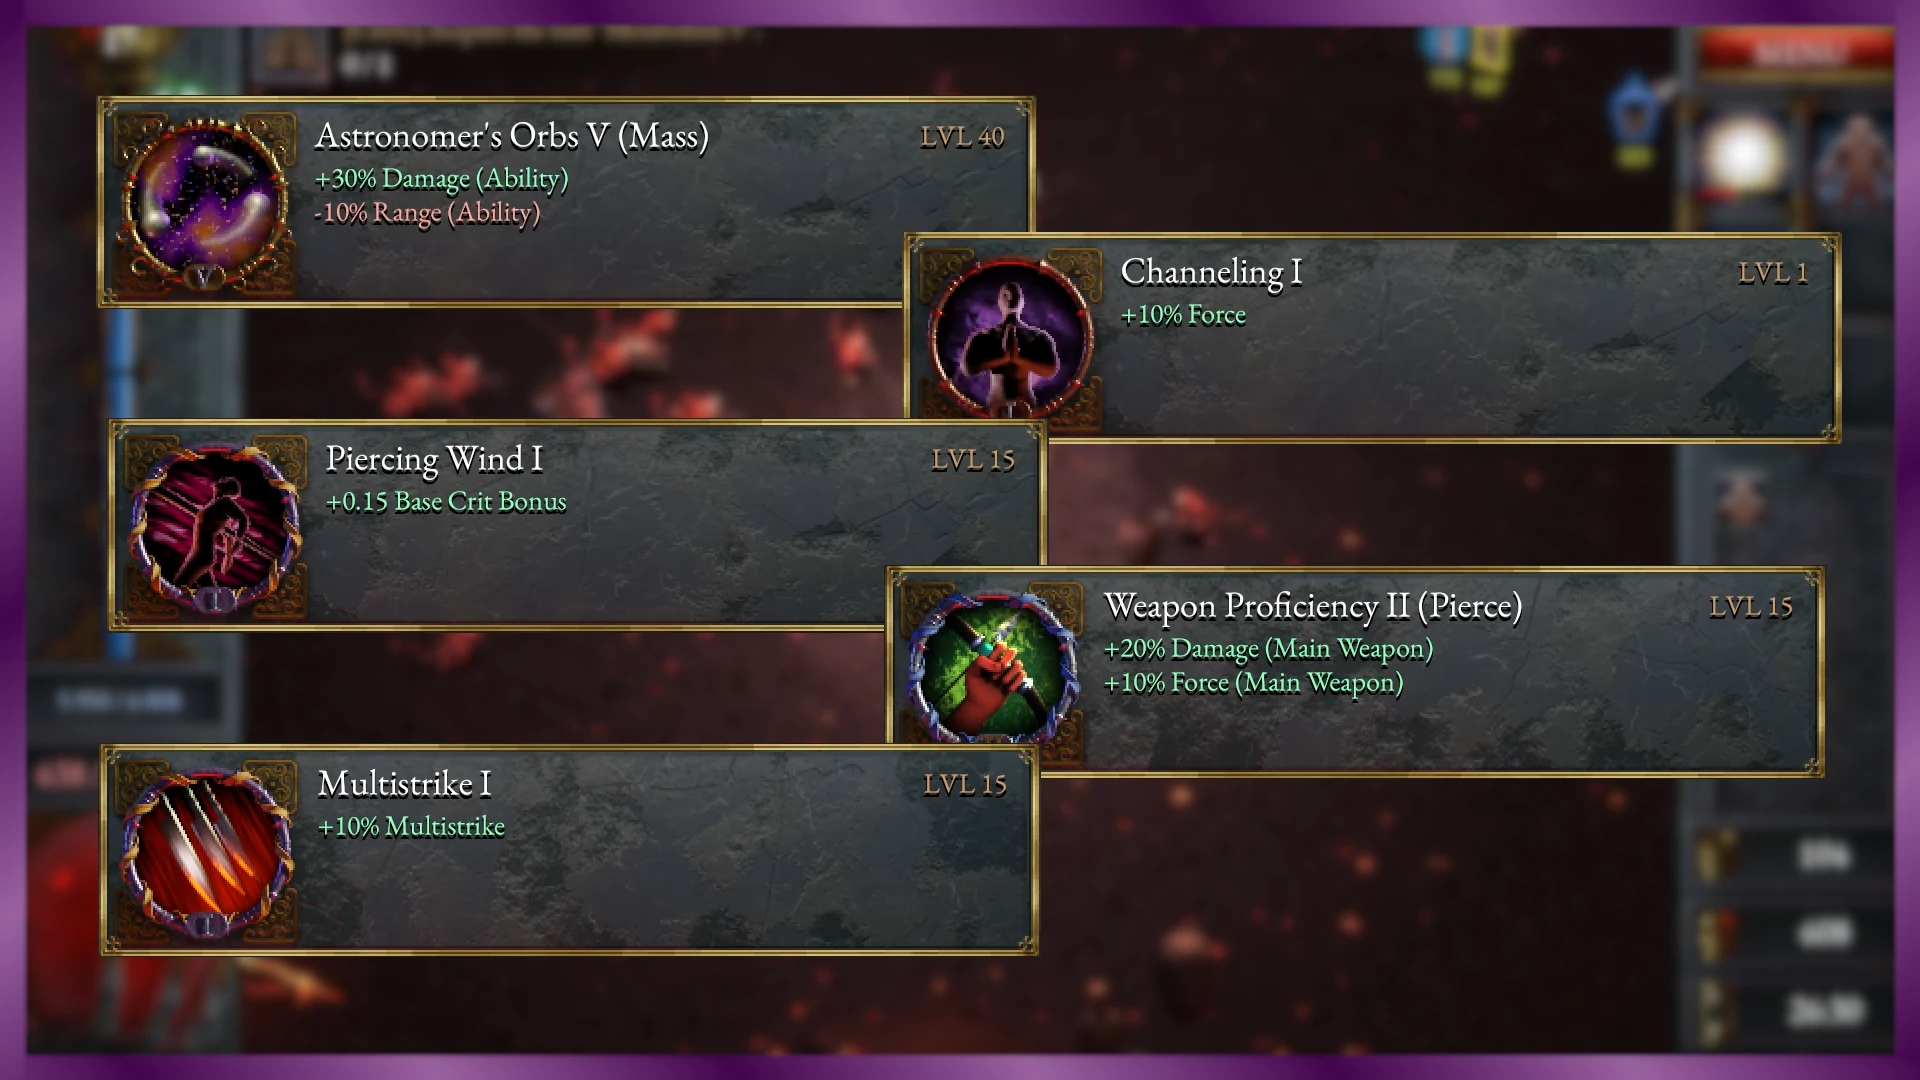
Before we dive in, let’s discuss some quick information about traits. Each trait has a name, a rank, and a description of how it boosts your stats. Generally speaking, most traits offer the same bonuses for each rank, but some grant powerful boosts at rank 10. You must select them in order, meaning you cannot choose rank 3 before selecting 1 and 2.
As you’re playing and leveling up, if you’re wondering why a certain rank of a trait isn’t showing up in your selection pool, odds are you are too low level. Each rank has a certain level threshold before they appear for you to choose. This is usually every five levels, but can be every eight or fifteen depending on the trait.
Now that with this simple explanation of trait anatomy is complete, let’s get into the different types of traits.
Basic Traits
Basic traits are the simplest form of traits. They are available from the beginning of the game, and offer straightforward upgrades. They also rank up at levels 5, 15, 30, and 50.

Generally speaking, basic traits are not bad and selecting one is a good option. It’s just that usually they are less good than their specialized counterparts. With the exception of a few classes (e.g. the Archer and selecting Crit Bonus/Chance), you’re almost always better off picking a different style of trait.
Trait Variants – What do the Arrows Next to Traits Mean?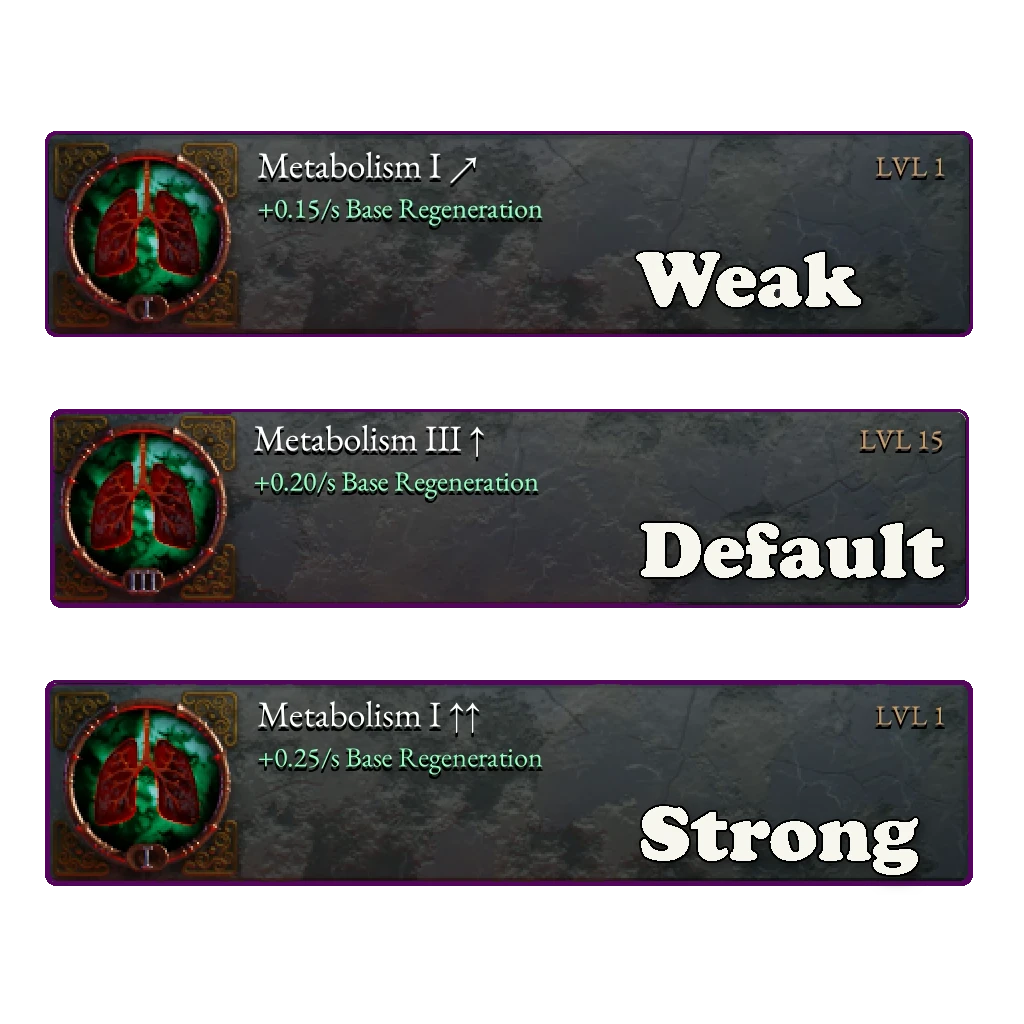
There are a few basic traits that vary in strength depending on which character you’re playing as. These are called trait variants.
Right now, there are only four traits that have variants: Vitality (health), Metabolism (health regen), Parry (block strength), and Thick Hide (defense). And each of these traits have a weak, normal, and strong version.
You can tell which is which by the arrows denoted in the trait selection image. The angled arrow means weak, the single upward arrow means normal, and the double upward arrow means strong.
A lot of the time this won’t make or break your builds, but it may impact which traits you opt for during level up.
Special Traits
Special traits are powerful upgrades that alter some of your characters strongest stats. These traits can be further broken down into elevated traits, class traits, and ability traits. The bulk of your build will be comprised of these traits.
They are not available at the start, and must be unlocked by completing quests and achievements.
Elevated Traits
Elevated traits are strong, and tend to upgrade rarer stats. This ranges from Multistrike, to Base Crit Bonus, to even altering your summons. Be careful though because some of them do have drawbacks, and apply penalties to your stats.
They tend to become available at level 15, and then can upgrade at levels 30 and 60.
Class Traits
Class traits are special traits that differ depending on what class you’re playing. They are powerful upgrades, and can confer some pretty significant bonuses. There are three different types of class traits: Weapon Proficiency, Proficient Stance, and Dedication.
Weapon Proficiency
These traits usually focus on increasing your damage per second in some direct capacity. That could be something as simple as raw damage increases, or increases to crit chance and crit bonus. They also tend to focus purely on your primary attack with your main weapon, not with abilities or damage from items.
Proficient Stance
Proficient Stance traits tend to focus on passive bonuses that make the character unique. For instance, the Warlock has Proficient Stance traits that focus on improving summons. The Swordsman grants bonuses to melee attacks. While the Beast Huntress improves physical attacks.
Dedication
Dedication traits usually provide bonuses to utility stats that the character specializes in. This typically includes movement speed, regeneration, or block strength and defense.
These traits are first available at rank 1 at level 5, and can be upgraded at levels 15, 25, 40, and 60. What further makes these traits unique, is that each type has two versions that you can select from. For example, when you level up the Warlock to level 5, you can select from Weapon Proficiency (Amplify) or Weapon Proficiency (Channeling).
Once you select one version, you cannot select the alternative for that rank. However once you get to level 15 and can select the rank 2 versions, you’ll be able to choose from both options again.
By unlocking class marks in Agony Mode, you’ll be able to add other class traits to your pool. Mixing and matching class traits allows for some pretty entertaining and broken builds.
Ability Traits
The final category of special traits, are ability traits. Like the name implies, these traits are all about improving the abilities you select with scrolls and tomes.
Like class traits, ability traits also have different versions. Each ability has six different versions to select from, although only two are available by default. The other four can be unlocked via quests tied to the ability itself.
The first ability upgrade will become available once you reach level 8, with further upgrades appearing every eight levels.
These traits are incredibly strong, but can sometimes have negative consequences to selecting them. It’s important to note that these traits only effect the ability specified, and not your general character stats. For example, if you select the Astronomer’s Orbs’ Speed trait (+15% Movement Speed and +10% Range), those bonuses only apply to the ability. Your character will not move faster, nor do they get increased attack range.
Unlocking New Traits
Luckily for us there is only one way to unlock new and upgraded traits, and that’s to complete quests. Unluckily for us, some quests can be quite difficult to complete.
Unlocking class traits usually involve performing a special task with the specified character. This can be something like waiting 180 seconds before moving with the Archer, or even landing 200,000 hits with your axes as the Norseman.
Similar to class traits, unlocking and upgrading ability traits involves performing feats with those abilities. Some of these are incredibly difficult.
The best piece of advice for completing some of the more difficult quests, is to focus purely on that quests for a run. Don’t be tempted into trying to complete two or three at at time. Sometimes it’s best to just focus down and hone in on optimizing a run to complete a single quest.
Clarifying A Few Traits
Now, the game does a decent job of explaining traits and the stats they improve. But even still, there are a few traits that beg clarification.
The following traits are common ones that players have questions about.
Elemental Surge
Elemental Surge is a trait that shows up in your trait pool once you reach level 50 and have either an attack or ability with the ‘Summon’ tag. They modify the damage type of your summons, and give them a small chance to apply a debuff on hit. The debuff is different depending on which damage type you choose.
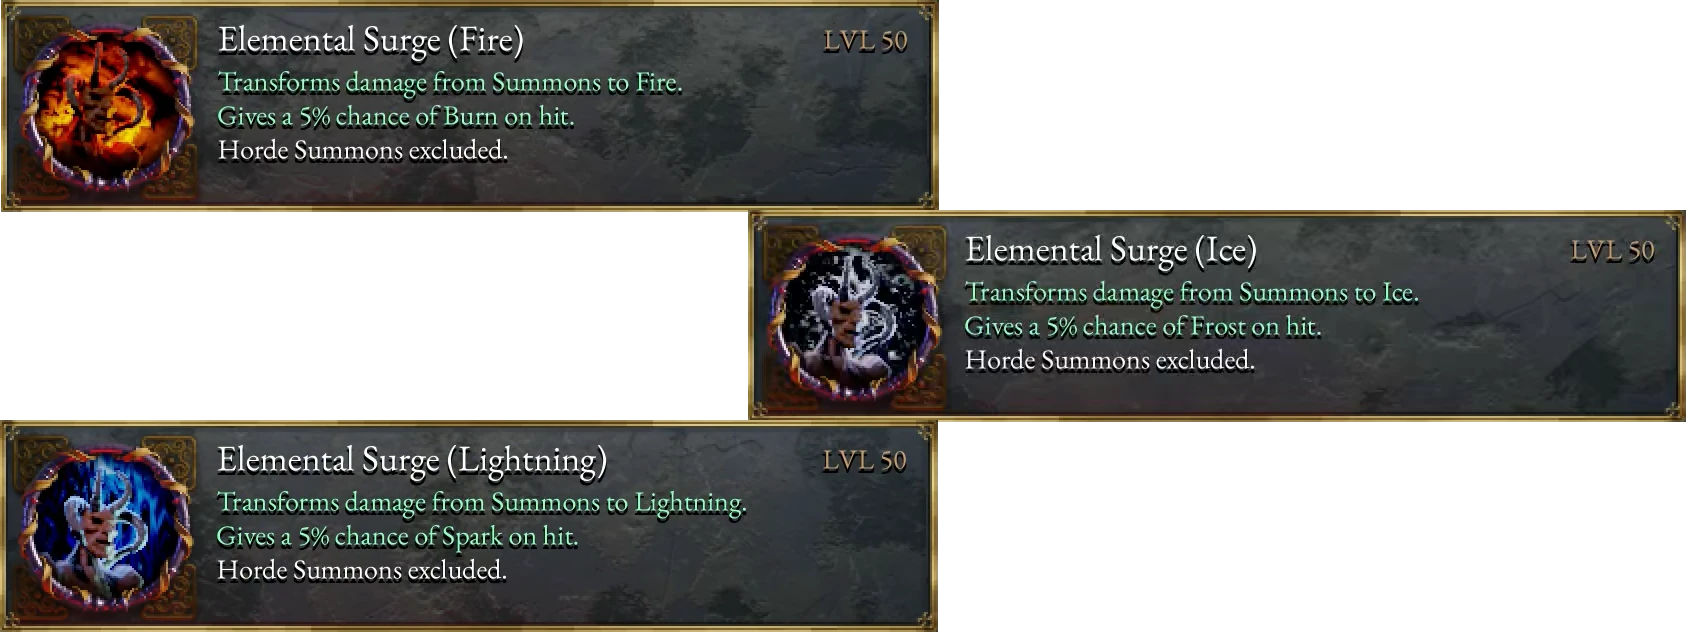
As you can imagine, this can be a pretty powerful trait to select if you’re going for a debuff and affliction heavy build. One thing to remember in this game is that an attack or ability’s tags determine its type. What I mean by that is that there are a few abilities with the ‘Summon’ tag, which directly benefit from Elemental Surge.
Astronomer’s Orbs is a popular ability selection, which does have the ‘Summon’ tag. It’s also easy to build up enough multistrike so that you have a large amount of orbs active at a given time. Each one of those orbs would have the 5% base chance to hit, which can be further upgraded with multiple traits.
So selecting Elemental Surge in this instance will allow you to constantly proc the specific debuff you’re looking for. Whether it be burn, frost, or spark, make sure you select the version that compliments your build. Once you choose one, the rest are locked out.
Ethereal Shift
Ethereal Shift is a powerful, albeit difficult to really use trait. It shows up in your strait pool at level 70. It confers a powerful bonus to one aspect of your character, while simultaneously providing a large penalty.
There are two versions of Ethereal Shift, version A and version B. A alters your melee or projectile attacks depending on which you choose. Version B changes your physical and magical damage.
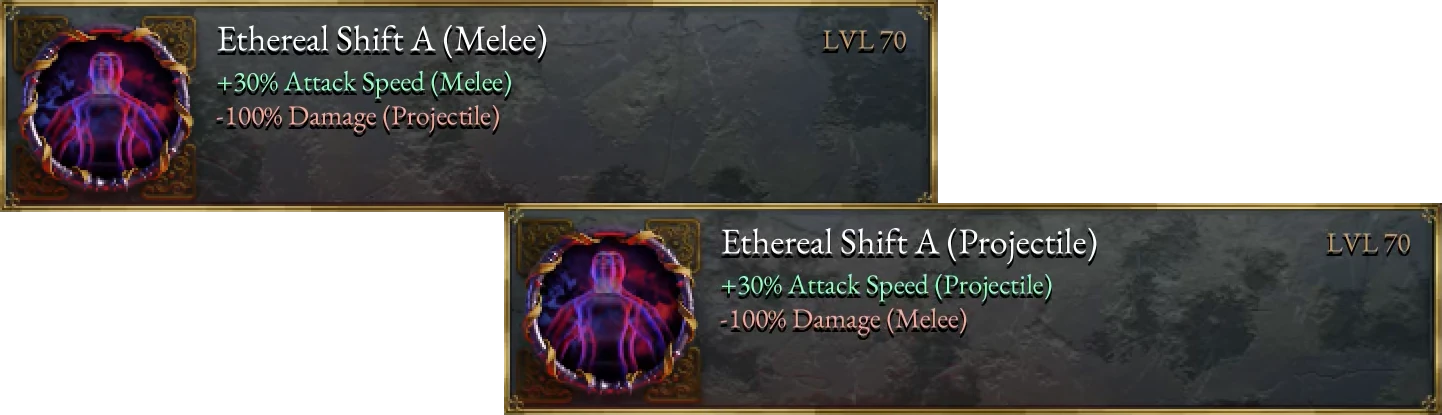
Basically you want to select the option that enhances your character. For instance the Archer would love to have the version that enhances projectiles, and at base may not care about the impact to his melee.
However, you need to be careful with these traits when it comes to your abilities. The traits affect those as well, and so you need to consider them as well as your primary attack.
That being said, with proper character and ability planning, selecting Ethereal Shift can result in some pretty fun and broken builds. Make sure to give it a shot and experiment to your hearts content.
False Blessing
The False Blessing trait is a godsend for debuff builds. It boosts your chance of inflicting fragile and affliction debuffs. This trait is a bit confusing, because it isn’t immediately clear what fragile and affliction mean. It’s only really explained in-game at one spot, and if you blink you’ll miss it.
When you have the False Blessing trait as an option and hover over it, a popup will appear to the left. The dialogue box there explains what Fragile and Affliction are, and how they impact your character.
For each stack of Fragile on the target, the amount of direct damage they take is increased by 5%. For each stack of Affliction, the damage taken from damage over time effects is increased by 5%. Damage over time effects include debuffs like burn and spark, so you can see how this is a powerful addition to builds utilizing those damage sources.
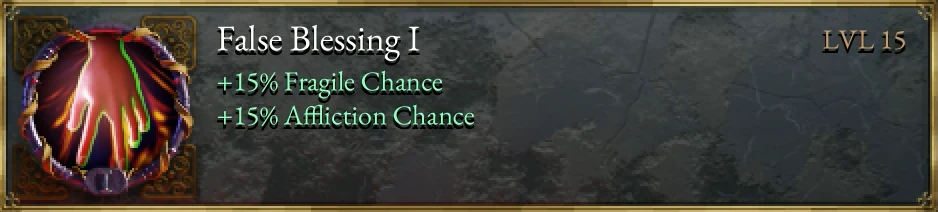
False damage won’t appear in your trait pool until you get to level 15 and have an ability or attack capable of inflicting fragile or affliction debuffs. However, this trait is pretty strong and is an excellent fit for those builds.
If you’re planning on stacking DoTs, or making use of Elemental Surge (Fire/Lightning), then odds are that you can also use the Fragile Blessing trait.
Piercing Wind
The Piercing Wind trait will increase your Base Crit Bonus. Overall it is an excellent trait that fits many builds, not just the crit focused ones.
One thing to note about this game is the way that the stats and upgrades interact with each other. Any trait you get that increases ‘Base’ stats, applies before other bonuses. In this case, it means that your Crit Bonus increases by a flat amount first, and then all the previously attained Crit Bonus upgrades will be applied. Making each of those percent increases much more effective.
So when you see something that increases ‘Base’ stats, it turns out to be extremely powerful.
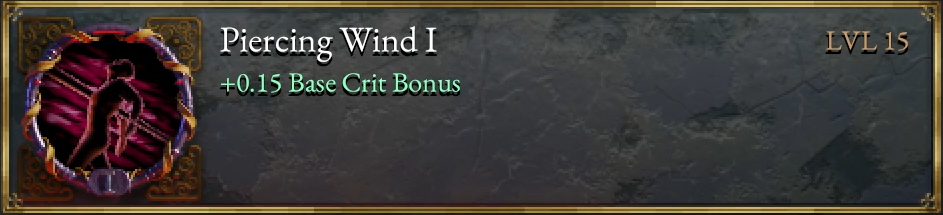
As previously mentioned even though Piercing Wind shines in crit builds, it’s just a great trait overall. Even on the characters with a low crit chance, since there are so many enemies crits will happen often enough. And at those times, you want them to hit insanely hard.
A Quick Word on Potions
If the trait mechanic wasn’t complicated enough, there is another system in the game that is closely intertwined with traits.
When you first start your Halls of Torment career, the traits you get upon level up are pretty much unchangeable. What you see is what you get.
However, after enough progression you’ll unlock the Cupbearer who will start to supply you with potions. Using potions allows you to modify your trait selection in various ways.
You’ll be able to reroll the selection pool, or you’ll be able to remove traits completely. At some point you’ll even be able to select the same trait multiple times in one level up.
Suffice to say, learning how to make the best use of potions will greatly aid your ability to maximize the effectiveness of your traits. It’s worth reading and understanding the potions, and increasing the amount you can use them per run.
Conclusion
As you can see, the traits mechanic in Halls of Torment is comprehensive. There are so many different types of traits, and they play such a critical role in forming your build.
At first, there won’t be many traits to choose from. But as you clear out the quest and achievement log, your selection pool will become vast. You’ll earn class traits and ability traits, and start making some incredible builds. At that point, hopefully the knowledge in this guide will help guide you in making your selection decisions.
Just remember to always check the tags on your primary attacks and abilities, in order to make sure you select traits that compliment them. Use potions to ensure that you get the exact traits that you want.
If you ever have any questions or need more information, be sure to check out the traits section in the Halls of Torment wiki.
Good luck on all your future runs.